What you will need
One A4 sheet, no glue, and your own hands. Start with a two-cut step before trying a landmark. Gather A4 paper or light card, a printer, a straightedge, fine scissors, a blunt scoring tool, and a cutting mat—a craft knife is optional.
Open the A4 practice sheet ↗ SVG master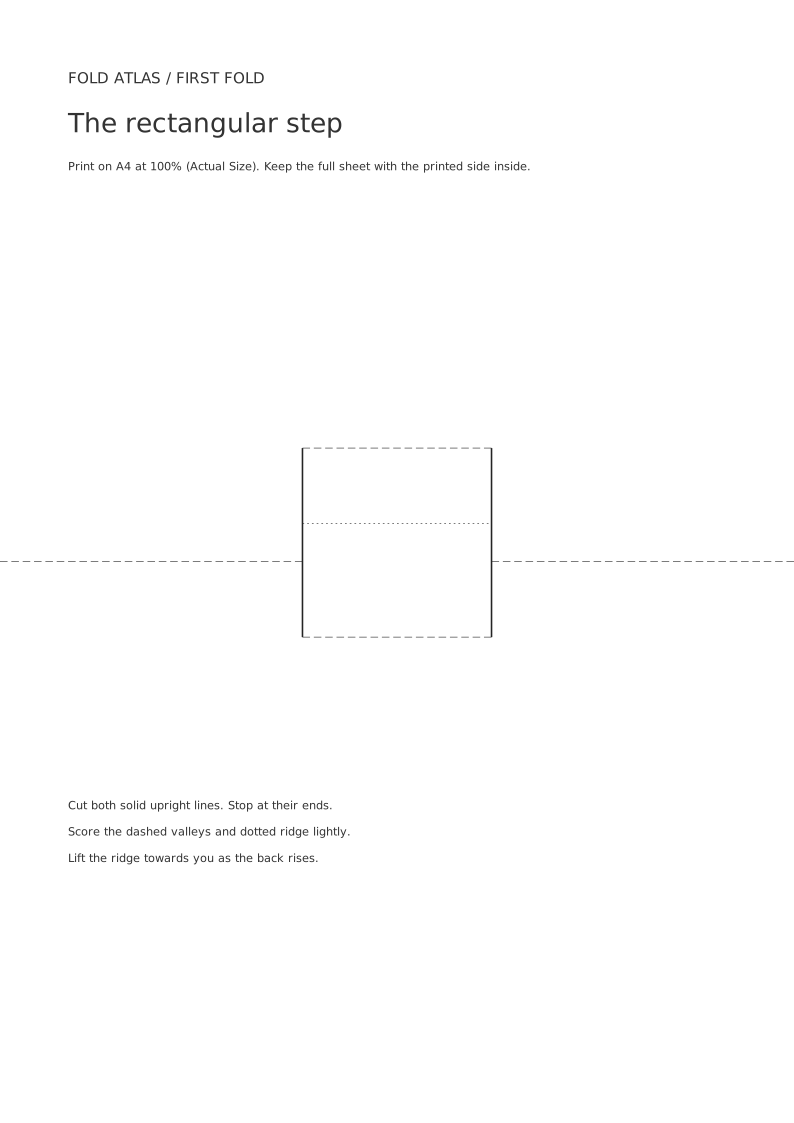

Make the first fold
Follow the silent captioned film, or work through the steps below. Animated from the digital masters; a physical trial is still to come.
At the workbench
Print at Actual size (100%)
Print the practice PDF on A4 at Actual size (100%)—turn off Fit to page. Use this same setting for any landmark, with no measuring needed. Lay it printed side up and find the two bold upright cut lines.
Make two slits
Pinch gently across one bold line and snip a tiny starter opening on the line. Open flat, slip a scissor tip in, and cut to each end. Repeat on the second bold line, leaving the strip attached at top and bottom.
Score the hinges
Rest a straightedge on each thin line and dent it lightly with your blunt tool. Printed face up, dashed valleys dip away and dotted mountains rise towards you. Score both dashed spine segments on either side of the step, leaving the gap between them untouched.
Raise the step
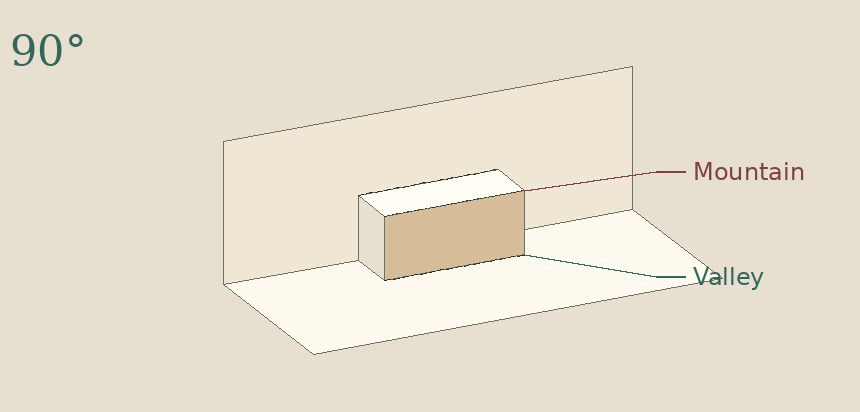
Start flat at 180°, print up. Hold the lower half down and gently raise the upper half, nudging the dotted ridge from behind while its dashed hinges tuck in. Stop at 90° with a level tread and upright front. If it catches, open flat and check the ends of both slits.
Cut Pont du Gard
Print the Pont du Gard sheet on A4 at Actual size (100%). With scissors, pinch and snip inside each shaded arch, then open flat and follow the bold outline—or trace it on the mat with an optional knife. Cut the base too and lift the loose waste out, keeping the white piers intact.
Raise the aqueduct
Start flat with all arches cut and hinges scored. Hold the front down and lift the back slowly, easing the lower, middle, and upper rows forward in turn until all three ledges stand level at 90°.
Film transcript
- Gather the print and scoring tools. The craft knife is optional.
- Print the practice PDF on A4.
- Find the two bold lines. The thinner lines are folds.
- Pinch across the solid line. Snip, open flat and cut to each end.
- Cut the second slit. Leave both ends of the strip attached.
- Score the dashed hinges lightly with a straightedge and blunt tool.
- Score the dotted ridge. Bend it towards the printed side.
- Score the dashed spine on either side. Keep the spine attached.
- Start flat at 180°. Hold the floor down and raise the back.
- Guide the ridge towards you. Let the dashed valleys sink in.
- Stop at 90°. The tread is level and its front stands upright.
- On Pont du Gard, cut around the shaded arch, including its base.
- Lift out the loose waste. Keep the white piers on both sides.
- With all the arches cut and hinges scored, start flat.
- Hold the front down. Lift the back slowly and ease the lower arcade forward.
- Keep lifting. Guide the middle row forward from the ledge below it.
- Ease the small upper row towards you as the back comes upright.
- Stop at 90°. Each row of arches stands on the ledge below.